
You must have seen different types of punch-out shapes. The idea is great to create a different design by punching the shapes. Punch out is a way to cut out a shape using another shape on top of it. It is considered to be a difficult task to punch out any shape. At the same time, you can use multiple shapes to punch only a shape.
We love the outcome after punching out shapes. You all have seen the punch-out tickets or any piece of paper. Many holes are punched out of the page and tickets. To add papers to files many people use to punch them.
It’s not only a circle that can be punched out of any shape. You can use any shape like a butterfly, a square, or even any animal shape. You just have to do a simple trick to place the shape on top.
You can also learn:
- Change Shape Corner in Adobe Illustrator
- Cut one Shape Out of Another in Adobe Illustrator
- Delete One Side of a Shape in Adobe Illustrator
- Combine Multiple Shapes into One in Illustrator
- Fill a Shape with Text in Illustrator
- Cut a Shape in Half in Adobe Illustrator
If you are a beginner or you don’t have any idea to punch out a shape in Illustrator then don’t worry, because you are in right place. This tutorial will give you a quick guide to punching out a shape in Illustrator.
Let’s Start.
Table of Contents
(Easy & Quick) Punch-Out a Shape in Illustrator
In this tutorial, we will punch out a shape in Illustrator using different shapes and different methods, so that you can have a clear idea of punching out any type of shape in Adobe Illustrator.
1st Method: Punch-Out by Minus Front
Step 1: Create a shape that you want to punch. Here we have created a handbook front page and now we want to punch it.

Step 2: Let’s create circles on the left side of the cover using the Ellipse Tool from the left toolbar, we will create circles by pressing the Shift key from the keyboard.

Step 3: Now as you can see we have created the circles on the cover as needed.

Step 4: Select all the circles by holding the Shift key from the keyboard.

Pathfinder Tool in Illustrator
Step 5: In the Properties panel, go to Pathfinder and select Minus Front.
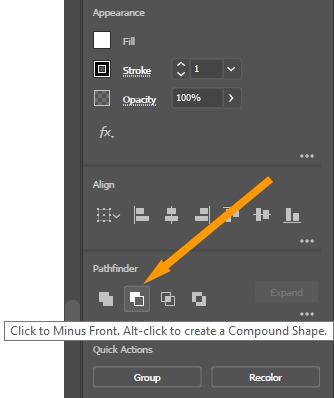
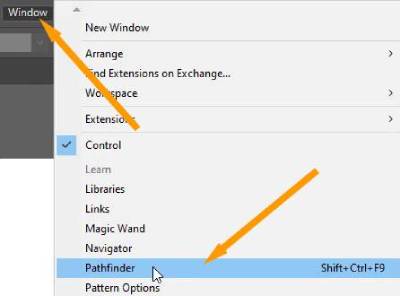
If you don’t find Pathfinder in the Properties panel then go to Window > Pathfinder. You can also use the keyboard shortcut key Shift+Ctrl+F9.
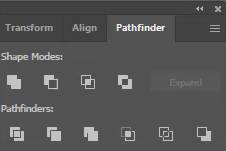
The Pathfinder panel will appear.
The shape will be punched out from the other shape just like we got the results here.
2nd Method: Punch-Out by Trim
Another way to punch out any shape is by using trim from the Pathfinder panel. So let’s see the steps below.
Step 1: Create a circle using the Ellipse Tool from the left toolbar.

Step 2: Create a square using the Rectangle Tool from the left toolbar.

Step 3: Adjust the position of the square in the middle of the circle, just like we did here.
Step 4: Grab the Selection Tool from the left toolbar. This tool helps to select objects on the artboard.

Step 5: Select both shapes by using the Selection Tool.

Step 6: Go to the Properties > Pathfinder > Trim.

If you don’t find Pathfinder in the Properties panel then go to Window > Pathfinder. You can also use the keyboard shortcut key Shift+Ctrl+F9. Pathfinder panel will appear.
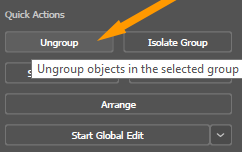
The shape will be Trim by the other shape but it is grouped. To see the result, we need to ungroup it.
Step 8: Go to Properties > Quick Actions > Ungroup.
Step 9: After you ungroup the shape, then unselect the shape by clicking on the white area.
Step 10: Now select the middle shape and move it.

You will see that the bottom shape is punched out in the shape of a square.

It’s Easy to Learn How do you punch out a shape in Illustrator
Now you know how to punch out a shape in Illustrator. You can easily punch out any type of shape in Illustrator. If you want to watch out the video tutorial to punch out a shape in Illustrator then you can find it at the top of this tutorial.
All Done! Enjoy.


Leave a Reply