
An artboard in Adobe Illustrator is a canvas on which you can create, design, and organize your graphics and illustrations. It is similar to a physical artboard, where you can create multiple designs or elements on separate boards and then arrange or combine them as needed. Artboards in Illustrator can be resized, rearranged, and have their own individual settings, such as color mode, bleed, and reference point. They provide a flexible workspace for creating multiple versions of a design or for creating designs for different mediums or outputs.
Artboards in Adobe Illustrator are an essential tool for graphic designers, illustrators, and other creative professionals. They provide a way to work on multiple designs within a single document and allow for easy organization of elements. Artboards can be of different sizes and orientations, making it possible to create designs for a variety of outputs, such as print, web, mobile, or social media. They can be resized and rearranged as needed to fit the requirements of the design.
Table of Contents
How to Add Artboard in Illustrator – Video Tutorial
You can also watch the detailed video tutorial below to add an artboard in Adobe Illustrator.
Another key feature of artboards in Illustrator is that they can have their own individual settings, such as color mode, bleed, and reference point. For example, you can create an artboard for a print design with CMYK color mode and bleed marks, while creating another artboard for a web design with RGB color mode and no bleed. This allows you to have separate settings for each design, making it easier to output each design in the correct format.
You can also learn:


If you are new or don’t have any idea to add an artboard in Adobe Illustrator then you are at the right place. In this tutorial, you will learn how to add an artboard in Adobe Illustrator.
So let’s start.
How to Add Artboard in Adobe Illustrator
To add artboard in Illustrator, go to File > New, select the settings from the New Document panel and click Create.
1st Method: Using File Menu
Following are the detailed steps to add an artboard in Illustrator.
Step 1:
Open Adobe Illustrator.
Step 2:
Go to the “File” menu and select “New”.
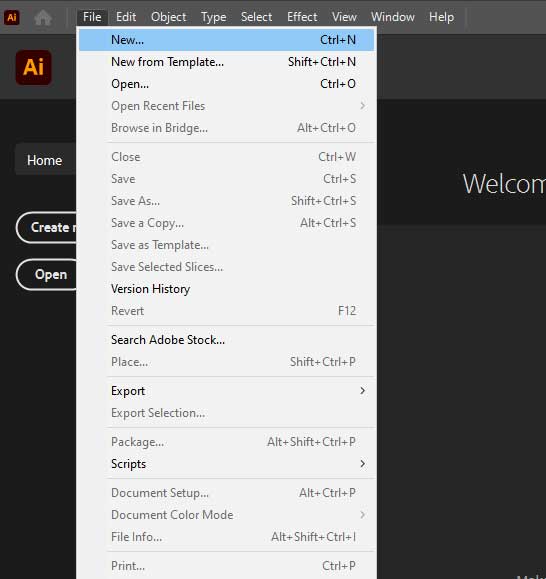
Step 3: In the “New Document” dialog box, select the “Artboard” option.
Select the size and orientation of the artboard from the “Preset” drop-down menu or enter your own custom size.
To add additional artboards, click the “Create new artboard” button in the “Artboards” panel (Window > Artboards).
In the “Artboard Options” dialog box, select the size and orientation of the new artboard.

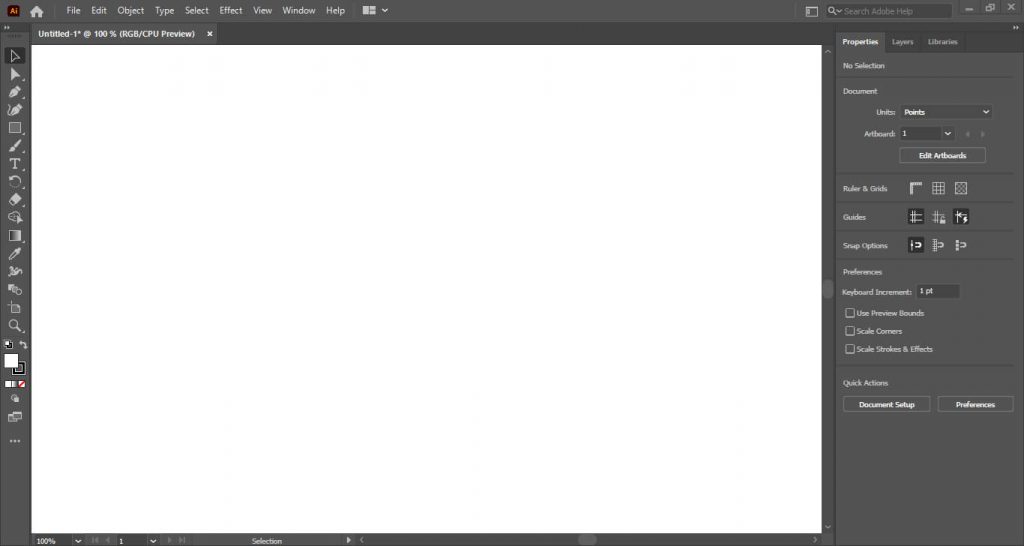
Step 4: Click Create.

The new document will be created.
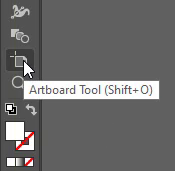
2nd Method: Artboard Tool
You can also create an artboard by selecting the “Artboard” tool from the toolbar and clicking and dragging on the workspace to create a new artboard of a custom size. To resize an existing artboard, simply click and drag the edges of the artboard.
Artboards can also be rearranged by clicking and dragging them within the “Artboards” panel.

You have learned to add artboard in Adobe Illustrator.
In this tutorial, you have learned to add artboard in Adobe Illustrator. You can add multiple artboards using the above given easy-to-follow steps.
Have More Questions?
If you have any questions related to adding artboard in Illustrator, you can ask in the comment section below. We have also answered the most frequently asked questions below.
How to Arrange Artboard in Illustrator
To Arrange Artboards in Illustrator, Go to Window > Artboards. The Artboard panel will appear. Click once, in the left bottom corner on an icon to arrange All Artboards. From Rearrange All Artboards panel, apply the setting of your choice and click OK. All artboards will be arranged.

How to Add Artboard in Illustrator Shortcut
The shortcut to add artboard in Illustrator is by using the Artboard Tool, you can press Shift+O and then click and drag on the canvas to add artboard.
All Done! Enjoy.


Leave a Reply