
If you want to change the size of the “Eraser Tool” in Adobe Illustrator CC, then you are at the right article. The Eraser tool in Adobe Illustrator CC allows you to remove areas of artwork or visual elements with a single click. When you increase the Eraser Tool size, you can rapidly erase big areas. However, if you’re new to the software, you might be wondering how to change the size of the eraser and make it more efficient. In this article, I will tell you how to select the Eraser Tool and use this tool to erase any shape in Adobe Illustrator after changing the size.
This is a quick and easy-to-understand tutorial, I believe you will understand easily.
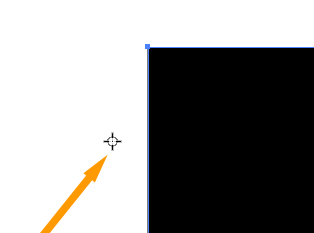
Launch Adobe Illustrator and select the desired shape that you want to edit.
Table of Contents
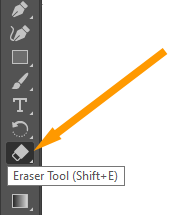
Selecting the Eraser Tool
Note: This tool will only work with the selected object.
Go to your left-side toolbar.
Select the “Eraser Tool“.
Eraser Tool Illustrator Shortcut Key
The shortcut key to select “Eraser Tool” in Adobe Illustrator CC is “Shift+E”. When you press “Shift+E” from your keyboard, The “Eraser Tool” will be selected, no matter which tool you have already selected.
The problem is by default the eraser brush size is “10pt”, which is very small and hard to use.
How to Change Eraser Size in Illustrator
If you want to change the eraser size then you can read further.
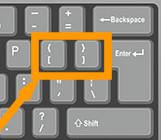
Method 1: Using Shortcut Keys
The best and simple way is to use the bracket keys “[ ]” on your keyboard. They can be found near the “Enter” key. These shortcuts can save you valuable time while working on your designs.
Method 1: Using Dialog Box
Another method is by double-clicking the Eraser Tool in the left Toolbar.
The Eraser Tool Options Dialog box will appear.
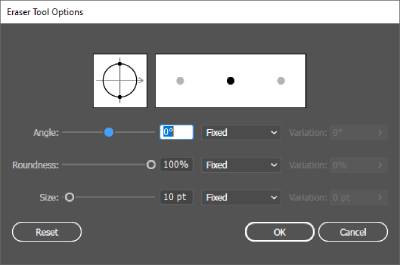
As you can see, the default size is “10 pt” in the third row. you can increase or decrease by moving the slider.
You can also reset to the default setting by pressing the Reset button in the left bottom corner.
Conclusion:
Now that you know how to change the size of the eraser tool in Adobe Illustrator, you can enhance your editing process and make it more precise. By utilizing either the Control panel or the Brush panel, you have multiple options to resize the eraser according to your needs. Additionally, incorporating keyboard shortcuts into your workflow can further boost your efficiency. With these techniques at your disposal, you can confidently edit your artwork with ease and achieve the desired results.
You can also learn:
Frequently Asked Questions (FAQs):
Can I change the eraser size in Adobe Illustrator while working on a specific object?
Yes, you can change the eraser size in Adobe Illustrator for a specific object. Simply select the object and then adjust the eraser size using the methods mentioned in the article. The changes will only affect the selected object.
Are there any limitations on the size range for the eraser tool in Illustrator?
The eraser tool in Adobe Illustrator allows for a wide range of sizes, from very small(0pt) to very large(1296pt). However, it’s important to note that extremely large eraser sizes might result in performance issues or impact the overall quality of your artwork.
Can I customize the eraser size beyond the options provided in the panels?
Yes, you can customize the eraser size beyond the options provided in the panels. You can use the shortcut keys from the keyboard “]” to increase the size of the eraser and “[” to decrease the size of the eraser. This way, you have more flexibility in choosing the exact size you need.
Do the changes in eraser size affect previously erased parts of the artwork?
No, changing the eraser size in Adobe Illustrator does not affect previously erased parts of the artwork. The eraser tool operates in a non-destructive manner, allowing you to modify the size without altering the existing erased areas.
Can I use the eraser tool to erase parts of a vector shape or path in Illustrator?
Yes, the eraser tool can be used to erase parts of a vector shape or path in Adobe Illustrator. Simply select the shape or path and apply the eraser tool to remove the desired portions. Keep in mind that the eraser tool functions on paths, so it won’t work on raster or pixel-based images.
Are there alternative methods for erasing in Adobe Illustrator?
Yes, besides the eraser tool, Adobe Illustrator offers other methods for removing parts of your artwork. You can use the Scissors tool to cut paths or shapes or utilize the Pathfinder panel to merge or subtract shapes. Experiment with different techniques to find the one that best suits your editing needs.
Can I change the default size of the eraser tool in Adobe Illustrator?
You can use the shortcut keys from the keyboard “]” to increase the size of the eraser and “[” to decrease the size of the eraser from the default size.
Will changing the eraser size affect other brush settings, such as opacity or hardness?
No, changing the eraser size in Adobe Illustrator will not affect other brush settings, such as opacity or hardness. The eraser size adjustment is independent of other brush settings, allowing you to customize each aspect of your brush stroke separately.
Can I use pressure sensitivity to control the eraser size?
Yes, if you have a graphics tablet that supports pressure sensitivity, you can utilize it to control the eraser size in Adobe Illustrator. Configure the pressure settings within your tablet’s software and Illustrator will respond accordingly, adjusting the eraser size based on your pressure input.
Are the methods mentioned in this article applicable to all versions of Adobe Illustrator?
Yes, the methods described in this article should be applicable to most versions of Adobe Illustrator, including the latest releases. However, the user interface or specific panel locations might vary slightly between versions, so make sure to adapt the instructions accordingly.
Remember, if you have any further questions or encounter any difficulties while changing the eraser size in Adobe Illustrator, feel free to seek additional help by asking the questions in the comment box below.
Happy Erasing!


Leave a Reply