
Do you want to add styles to your text? Well, multiple ways can help to Distort Text in Adobe Illustrator. Many designers use Distort Text for their designs. Because the same simple text can’t be used in every design and art.
The designs may become boring when we use simple text which doesn’t have any distortion or design effect. Distort Text can also increase and enhance the look of your project.
You can also learn:
- Underline Text in Illustrator
- Bold Text in Illustrator
- Italicize text in Illustrator
- Shear Text in Illustrator
If you are new and don’t understand the right way to Distort Text in Illustrator, then you are in right place. In this tutorial, you are going to learn How to Distort Text in Illustrator.
Let’s Start.
Table of Contents
Distort & Transform Text in Illustrator
In Adobe Illustrator there are multiple ways to Distort Text. All methods provide unique Distort Text effects. We will look at all the methods one by one in detail.
1st Method: Distort & Transform
Free Distort can be used when you want to Distort the text according to your own choice. Let’s see how it works.
We are using a sample text to demonstrate to you how the Free Distort works on the Text.
How to Free Distort Text in Illustrator
Step 1: Select the text using the Selection Tool that you want to Distort.

Step 2: Go to Effect > Distort & Transform > Free Distort.
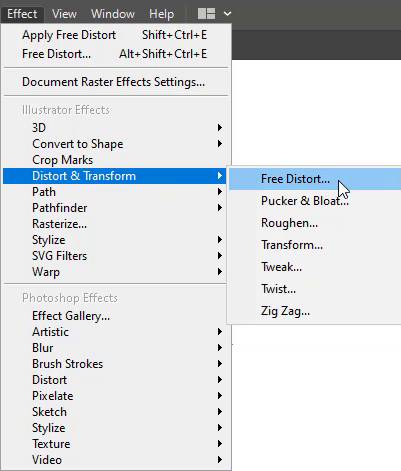
Step 3: Free Distort panel will appear.

As you can see that the Free Distort panel has the selected text inside it. The text can be freely distorted using this panel.
Step 4: There are Anchor points that can be used to Distort the Text.

Move the Anchor points according to the way you want to Distort the text. After editing the Text from the Anchor point, Click OK.

When you click OK the selected text will be distorted and will appear the same as you edited it using the Anchor points in the Free Distort panel.

2nd Method: Twist
Another way to Distort Text is by using the Twist effect. Twist Tool can be used to distort the text at any angle according to your choice. Let’s see how this work.
Step 1: Select the Text using the Selection Tool that you want to Distort using the Twist.
Step 2: Go to Effect > Distort & Transform > Twist.

Step 3: Twist panel will appear.

Step 4: Change the Angle value to Twist the Text. Here we have set the twist Angle to 33o.

Note: You can add the value in the Twist angle according to your choice.
You can see that the text is distorted using the Twist.

3rd Method: Make with Warp
The warp can also help to Distort the Text in multiple ways. Let’s see how it works.
How to Warp in Illustrator
Step 1: Select the Text that you want to distort using the Selection Tool.
Envelope Distort Illustrator
Step 2: Go to Object > Envelope Distort > Make with Warp.

You can also use the keyboard shortcut Alt+Shift+Ctrl+W to see the Warp Options.
Step 3: The Warp Options panel will appear.

Text Warp Illustrator
As you can see, there are 15 styles available in the Warp Options panel that can be applied to text. All the styles are unique and have an amazing warp effect.

Step 4: Choose any style that you like most and that fits with the design you are creating. Here we are selecting Fish Style.

After selecting Fish Style you can set it to Horizontal or Vertical.

The bending of the style can also be changed. Distortion of Horizontal and Vertical can also be changed using the slides available. Click OK when you are done.

Note: Make sure to Check Preview so that you can see the changes before clicking OK to see all the effects applied to the text and can easily change according to your choice and requirements.

Here is the final look of the text that is distorted using the Fish Warp.

4th Method: Make with Mesh
Make with Mesh can also help to distort the text according to the designer’s choice. Let’s mesh the text.
Step 1: Select the text using the Selection Tool.
Step 2: Go to Object > Envelope Distort > Make with Mesh.

You can also press the keyboard shortcut Alt+Ctrl+M to see the Mesh Options as well.
Step 3: Envelope Mesh panel will appear. Also, you can see a mesh appeared in the text.

Step 4: Set Mesh Rows and Columns. Here we have set Rows to 5 and Columns to 7. You can set it according to your choice. Press OK when you are done.

Step 5: After you have pressed OK from the Envelope Mesh panel, you can see mesh rows and columns increased as we increased the number in the Envelope Mesh panel.

Step 6: Select the Direct Selection Tool from the left toolbar.
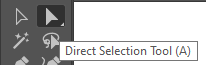
Step 7: Now click on the Anchor point available within the Mesh.

As you click on the Anchor point it will be selected as you can see in the image below.

Step 8: Click and hold the left click and then drag it to any position to distort the text.

You can repeat this for any anchor points to add distortion to the complete text as you can see in the image below we have done.

So it’s the final look of the distorted text that can be done using the Mesh.

You have learned to Distort Text in Illustrator.
In this tutorial, you have learned to Distort Text using multiple ways. Each method has its unique features to Distort the Text. You can apply any distortion to the text according to your choice.
You can also watch our detailed video tutorial to learn How to Distort Text in Illustrator at the top.
Do You Have More Questions?
If you have any questions regarding Distort Text then you can ask in the comment section below.
All Done! Enjoy.


Leave a Reply