
The neon effect is one of the best effects in the graphic design industry, as it provides the most attractive visual impact of any text. You may have seen neon signs outside of hotels, coffee shops, and many other places. We mostly used it for showing the names clearly at night or in darkness.
Table of Contents
Realistic Neon Effect in Adobe Illustrator
You can also watch the detailed video tutorial to learn how to make a realistic neon effect in Adobe Illustrator.
In Adobe Illustrator, we can also create neon effects to add to our design. Using a dark background and then a neon effect on top can make the design look more attractive.
If you are new or don’t have the idea to make a neon effect, then you are in the right place. In this tutorial, you will learn how to create a neon effect in Adobe Illustrator.
Let’s start.
How to Make Neon Text in Illustrator
First thing first, we will make neon text on a wall, So download the wall picture from pixabay or pexels.com.
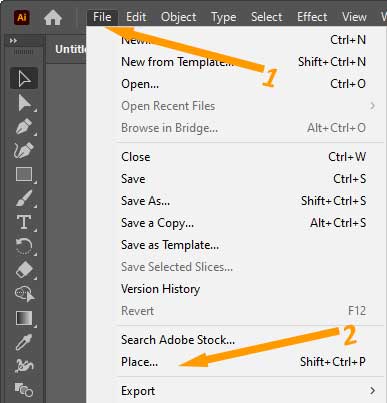
Place it on artboard by going to place option under File menu.
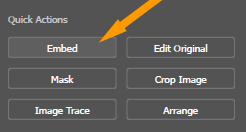
Then click on the Embed button under the Quick Actions panel.
Now adjust it on the artboard as I am making in the below image. I have spread the image on full artboard by using its corners.

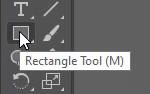
Now, select the Rectangle Tool from left side toolbar.
Draw a rectangle on full artboard as shown in the image.

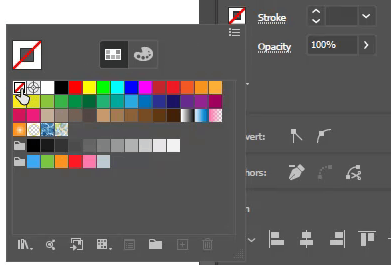
Fill the black color by going to Fill option under Appearance panel.

You can also remove the stroke by removing the stroke color.
Set the Opacity as 90%.

Select Type Tool and then type text on top of it.

Type any text to get the neon effect. Here we are using the text “NEON” and want to give it a neon effect.
Select it using the Selection Tool.

After selecting the text, go to Properties > Character > Choose your desired font. I am choosing “Montserrat Thin”.

After selecting the font, go to Appearance > Fill. Choose your desired color.

Now open the Appearance panel by going to “Appearance” section or go to Window > Appearance.

The “Appearance” panel will appear. Click on “Add New Stroke.”

As you click on Add New Stroke, a black stroke will be applied to the text.

Click once on the stroke color.
Stroke colors will appear. Now select any color of your choice.

Increase the Stroke according to your choice. Here we have increased the stroke to 16pt.

Now as we selected the stroke option that we have just added.
Go to Effect > Blur > Gaussian Blur.

From the Gaussian Blur, set the blur to 42 pixels and click OK.

Here is the text with the neon effect.

You can do the same with any shape to create its neon effect.
You have learned to make neon effect in Adobe Illustrator.
In this tutorial, you have learned to create neon effect in Adobe Illustrator. The neon effect can be used for logos, names of any hotel and coffee shop, and much more.
Have More Questions?
If you have any questions related to creating neon effect in Adobe Illustrator, ask in the comment section below.
Neon Effect in Illustrator Download
If you want to download neon effect as an Illustrator file, you can download it here.
Neon Text Illustrator Template
You can get the neon text Illustrator Template here.


Leave a Reply