
As you are working in Adobe Illustrator, and right after you have completed the design that you are creating, make sure to preview it first. A preview of the design is really important before gettings its prints. Because there might be a mistake that you have made, and preview will help you to fix it.
Table of Contents
Preview in Illustrator – Video Tutorial
You can also watch below video tutorial to learn how to preview the designs in Adobe Illustrator. In the video, we will show you different preview options and what they look like.
Being a designer, you must have a habit of previewing your artwork or any type of design before submitting it for display or print. A preview will help you to have a look at any mistakes if you have created any and you will be able to fix that. Sometimes the colors and the font is not according to what you have wanted.
You can also learn:
- How to Get Out of Isolation Mode in illustrator
- How to Get Out of Outline Mode in Illustrator
- How to Delete Everything Outside the Artboard in Illustrator
If you are new or don’t have any idea how to preview in Adobe Illustrator, then you are in right place. In this tutorial, you will learn how to preview different artboard views in Adobe Illustrator.
So let’s start.
How to Preview in Adobe Illustrator
Adobe Illustrator has four different types of previews. The available preview in Adobe Illustrator under the View menu is Outline, Overprint Preview, Pixel Preview, and Trim View.

These previews are used while you are designing anything on the artboard. We will look at all previews in Illustrator one by one.
Outline View in Illustrator
The outline view is used when you are working with the details of the designs. To see how the lines are appearing within the design and shapes and all text. You will see no colors in images, text, or shapes.
Here is the original design with the image and all colors.

To turn on the outline view, go to View > Outline. You can also press Ctrl+Y to switch between outline view and Preview view in Illustrator.

As you can see the outline view looks like this. You cannot see any colors in the text or in any shape.

Overprint Preview in Illustrator
To use the Overprint Preview, go to View > Overprint Preview. You can use the shortcut key to switch between overprint previews by pressing Alt+Shift+Ctrl+Y.

Overprint preview helps you to see the design and all the editing applied to text like shadows, and strokes in overprint. It’s necessary to see the design in the overprint preview so that you get an idea of how the design will appear after printing. The artboard disappear and you just see the complete design on a white background as you can see below.

Pixel Preview in Illustrator
Pixel Preview is needed when you want to look for how your design will turn out if you publish it on any web browser. Because in the Web Browser you will see the rasterized design.
To use the Pixel Preview, go to View > Pixel Preview. You can use the shortcut key Alt+Ctrl+Y to switch between pixel preview.
As you switch the view in Pixel Preview, you can see the Pixels on the design.
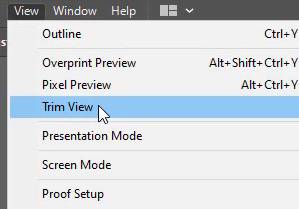
Trim View in Illustrator
Trim View works if you have any object outside of the artboard. When you use the Trim View everything outside of the artboard disappears. You will only see what is on the artboard. So the Trim View basically helps to make the design organize and easy to view and trim everything that is not on the artboard.
As you can see the background image is all overspread and it is outside of the artboard. So here we will use the Trim View to trim out the part that is not on the artboard.
To use the Trim View, go to View > Trim View.
So here you can see the design is only on the artboard and everything outside is trimmed.

How to View the Current View of Document in Illustrator
If you want to about the current view of your document, then you can see it next to your file name. As currently, we are in the Preview view which is why in the view space in the name, you will see the Preview.

As you change the preview, the view you apply to your document will be visible here. You don’t need to do any effort to see the current view. Adobe Illustrator shows automatically to its user in which view they are currently.
You have learned how to preview in Illustrator.
In this tutorial, you have learned about different Previews in Adobe Illustrator. You can switch between all four previews whenever needed. So it’s necessary to make sure that whenever any preview is needed, you don’t forget to use it before publishing your design on any web browser or getting the print.
Have More Questions?
If you have any questions related to previewing in Adobe Illustrator, you can ask in the comment section below. We have also answered some most frequently asked questions below.
How to Preview in Illustrator Shortcut
The shortcut key to Preview in Illustrator is Ctrl+Y. You will get into Outline View.
How to Turn off Preview Mode in Illustrator
To turn off Preview Mode in Illustrator press Ctrl+Y from the keyboard and the Preview Mode will turn off and you will be in Outline View.
How to See Print Preview in Illustrator
To see the Overprint print preview before printing the design in Illustrator, go to View > Overprint Preview or press Alt+Shift+Ctrl+Y from the keyboard.
How to Preview in Illustrator Without Bleed
To Preview in Illustrator without bleed then go to View > Trim View.
Presentation Mode Illustrator Shortcut
The shortcut key for Presentation mode is Shift+F or go to View, Presentation Mode in Illustrator.
Illustrator Stuck in Preview Mode
Press Ctrl+Y if you are stuck in Preview mode in Illustrator, or go to View > Outline. You can select any view mode under the View menu.
Illustrator Presentation Mode
Illustrator presentation mode can be turned on by View > Presentation Mode or press Shift+F. Presentation mode helps to see the design as a presentation.
How to Get Out of Presentation Mode in Illustrator
To get out of presentation mode in Illustrator, press the Esc key from the keyboard. If you want to get in presentation mode then press Shift+F.
All Done! Enjoy.


Leave a Reply