
Adobe Illustrator has a wide range of coloring tools. You can apply different colors to your art, designs, text, and logos by using different color palettes available in Illustrator. You can increase the look of your design by choosing the colors of your choice or according to your brand designs by using Eyedropper Tool in Illustrator.
Sometimes we all are stuck when selecting colors for a specific design. Because we all are not able to remember every color code. So the best helper to select the color from a theme, logo, or brand is Eyedropper Tool.
Table of Contents
What is Eyedropper Tool in Illustrator?
The Eyedropper Tool helps to pick a color from an image, a logo, or any object and then apply that color to the other shape or any design that you are creating in Adobe Illustrator.
You can also learn:
- Use Gradient Tool in Adobe Illustrator
- Use the Blend Tool in Adobe Illustrator
- Use the Mesh Tool in Adobe Illustrator
- Use the Eraser Tool in Adobe Illustrator
- Use the Pen Tool in Adobe Illustrator
Eyedropper Tool can also save a lot of time because you don’t have to search for the color. All you have to do is use the Eyedropper Tool in any of your work projects to choose the color from any image and use that in your work. It’s best when you are creating multiple designs for a brand.
If you are new or you don’t have any idea to use the Eyedropper Tool, then you are at the best place. In this tutorial, we will give a step-by-step guide to using the Eyedropper Tool so that you don’t get stuck while selecting the color of the brands for your upcoming projects.
Let’s Start.
Use Eyedropper Tool in Illustrator
To use the Eyedropper Tool in Illustrator, first of all, you can open any existing design or text in Illustrator according to your need. Here we have used a text file to use the Eyedropper Tool for filling the colors inside it by using the colors of an Image.
Open File
Step 1: To open an existing file go to File > Open. You can also press the keyboard shortcut Ctrl+O to open the image.
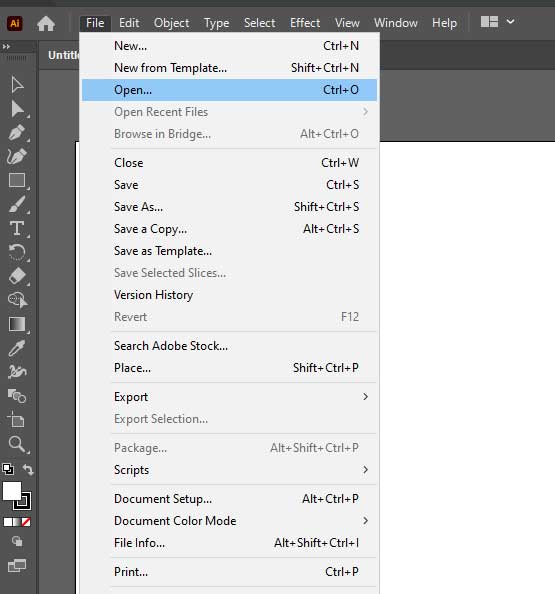
Step 2: Open dialog box will appear.
Step 3: Select the file from its location and select Open from the bottom right corner.

The file will be opened in Adobe Illustrator.

Note: You are free to use any type of Illustrator file whether its have text or a logo or any other design. Always keep in mind the file should be in AI format. Otherwise, you will have to trace the image of any object first. Then you’ll be able to use the Eyedropper tool on the shape.
Place Image to use Colors
As we want to use the colors of any image to fill in text or the shape using Eyedropper Tool in Illustrator so let’s first place the image on the artboard.
Step 4: Go to File > Place or you can also press the shortcut key Shift+Ctrl+P from the keyboard to place the image.
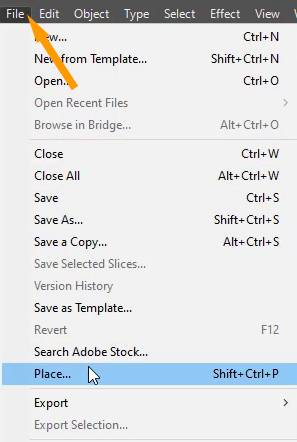
Step 5: Place panel will appear. Select the Image and click on Place in the bottom right corner.

Step 6: The image will appear with the pointer.

Click anywhere to place it on the artboard.

Fill Color using Eyedropper Tool
Now we will use the Eyedropper Tool to fill different colors in the text from the image.
Step 7: Grab the Selection Tool from the left toolbar.

Step 8: Select the object to fill the color in it using the Selection Tool.

Eyedropper Tool Illustrator
Step 9: Grab the Eyedropper Tool or press I from the keyboard.

Step 10: Click on the area of the image from where you want to choose the color.

As you click on the image, you can see that the color of the selected area by using the Eyedropper Tool will be filled in the selected Text.
Repeat this for all the remaining characters or objects.

Note: Always keep in mind that you have to select the object or character first by using the Selection Tool.
As you can see the colors of the image are filled in the Text.

Note: You can also use any shape to fill in the color by using the eyedropper. The color of any image can be used easily.
Today you have to learn to Use the Eyedropper Tool in Adobe Illustrator.
Now you can use the Eyedropper Tool for your upcoming projects easily. Eyedropper Tool saves a lot of time in filling the colors in a shape from any image or logo. You can also watch the detailed video tutorial to use the Eyedropper Tool in Illustrator that is given at the start of this tutorial.
You can also learn: Where is the Fill Tool in Illustrator
Do You Have More Questions?
If you have more questions related to the Eyedropper Tool then feel free to ask in the comment section below. Some of the most frequently asked questions are also discussed below.
Eyedropper Tool Illustrator Shortcut
The shortcut to use the Eyedropper Tool in Illustrator is I.
Illustrator Pick Color From Screen
To pick a color from the screen in Illustrator use the Eyedropper Tool from the left toolbar. Select the object first by using the Selection Tool and then select the Eyedropper Tool from the toolbar. Click on the screen from where you want to pick the color.
Eyedropper Tool Illustrator Not Working
If Eyedropper Tool is not working in Illustrator then you should reset it to default settings by pressing Ctrl+Shift+Alt from the keyboard. The Illustrator will be reset and the Eyedropper Tool will start working.
All Done! Enjoy.


Leave a Reply