
Vectorizing an image is the process of converting a raster or bitmap image, which is made up of pixels, into a vector image, which is made up of geometric shapes and paths.
In a raster image, each pixel contains a specific color or shade of gray, and the overall image is created by combining these pixels. This type of image is resolution-dependent and can become pixelated or blurry when resized.
In a vector image, on the other hand, the image is created using mathematical equations and geometric shapes such as points, lines, and curves. This type of image is resolution-independent, which means it can be scaled up or down without losing quality or becoming pixelated.
Vectorizing an image allows you to create a scalable version of the original image that can be used for a variety of purposes such as logos, illustrations, or graphics for print or web design. By converting the image to a vector format, you can edit the shapes, colors, and sizes of the image without losing quality or resolution.
You can also learn:
- How to Outline an Image in Illustrator
- How to Fill Image in Illustrator
- How to Mirror Image in Illustrator
- How to Vectorize an Image in Illustrator
If you are new or don’t have any idea, how to vectorize an image in Illustrator, then you are at the right place. In this tutorial, you will learn the detailed steps to vectorize an image in Adobe Illustrator.
So let’s start.
To vectorize an image in Adobe Illustrator, you can follow these steps:
Open the image you want to vectorize in Illustrator.
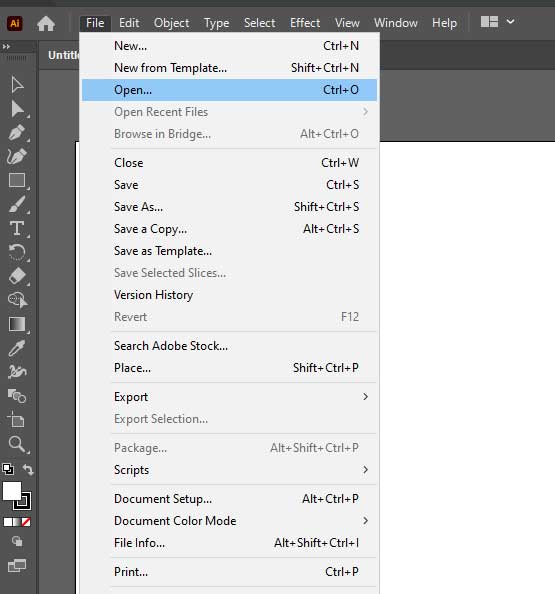
Select the image using the Selection tool (the black arrow), and go to “Object” > “Image Trace” > “Make” in the top menu. This will bring up the Image Trace panel.


In the “Image Trace” panel, which is under “Properties” panel, you can choose from a range of presets to apply to the image, or adjust the settings manually.


The presets will give you a starting point, and you can fine-tune the settings to achieve the desired result. For example, you can adjust the Threshold to control the level of detail in the vectorized image or adjust the number of Colors to use in the image.
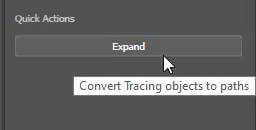
Once you have adjusted the settings to your liking, click “Expand” under the “Quick Action” section to convert the image to a vector object.
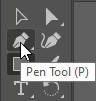
You can then further refine the vector object by editing the paths and shapes using the Direct Selection tool (the white arrow) or the Pen tool.

You have learned to vectorize an image in Adobe Illustrator.
In this tutorial, you have learned how to vectorize an image in Adobe Illustrator. You can now easily vectorize an image in Adobe Illustrator using the above-given step-by-step method.
Have More Questions?
If you have any questions related to vectorizing an image in Adobe Illustrator, you can ask in the comment section below.
All Done! Enjoy.


Leave a Reply