
Adobe Illustrator provides easy ways to color overlay the images. To improve the design quality, you can add different color overlays to the images. You can create different color effects in Adobe Illustrator. You can add color overlay using the colored shape and then the transparency of shapes to create different effects.
Adding color overlay requires the images to be grayscale first, and then use the other shapes on top of the image. Adobe Illustrator comes with different tools to easily edit the images to the ones of your choice. In Adobe Illustrator, you can select any shape color and then change its transparency to achieve significant results.
Color Overlay in Adobe Illustrator – Video Tutorial
You can also watch the below video tutorial to learn how to color overlay images in Adobe Illustrator. You can add any shades or color to the overlay of your choice by using shapes on top of the images.
Adding color overlay improves the design and it becomes more inspiring. You can different color overlays to the images and then choose any one that fits your designs or that you find them good.
You can also learn:

If you are new or don’t have any idea to color overlay in Adobe Illustrator, then you are at the right place. In this tutorial, you will learn how to color overlay in Adobe Illustrator. You will learn to add different colors to the overlay and then you can keep one or all and use them in your designs and projects. You can add text on the overlay or you can use them to give amazing shades to your designs.
So let’s start.
How to Color Overlay in Adobe Illustrator
To color overlay image or shape in Illustrator, set the image to grayscale and then draw a shape on top of the image, select a color for the shape and then change the blend mode to Overlay. The color overlay is ready.
Following are the details steps to color overlay in Adobe Illustrator.
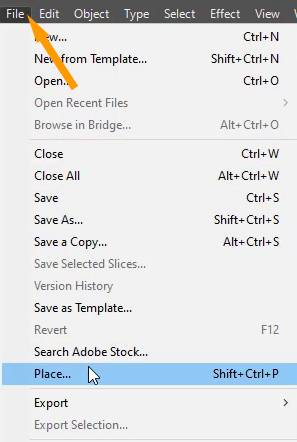
Step 1: Place the image on the artboard
The first step is to place the image on the artboard that you want to convert to a color overlay. You can use any image of your choice that you want to use in your design project.
To place the image in Illustrator, go to File > Place. The shortcut key to place the image in Illustrator is Shift+Ctrl+P.
Place panel will appear. Select the image from its location and click Place.
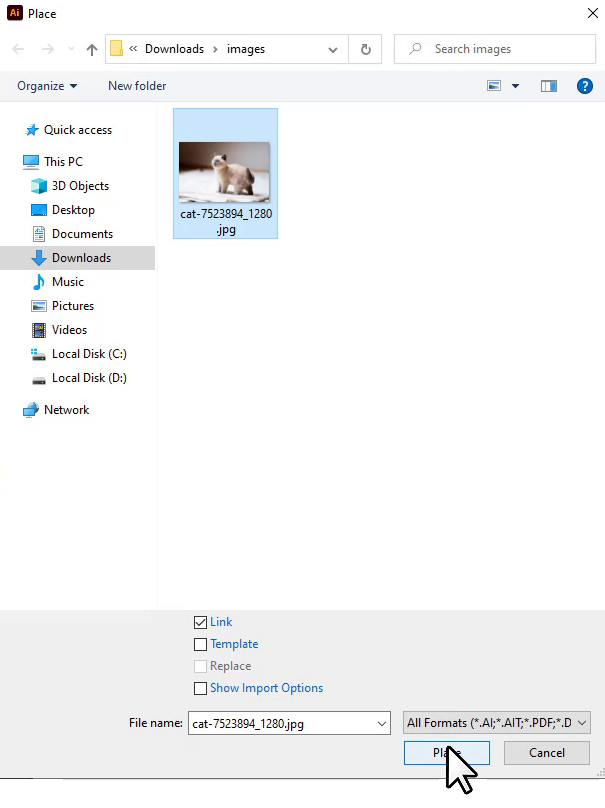
The image will appear with the pointer.

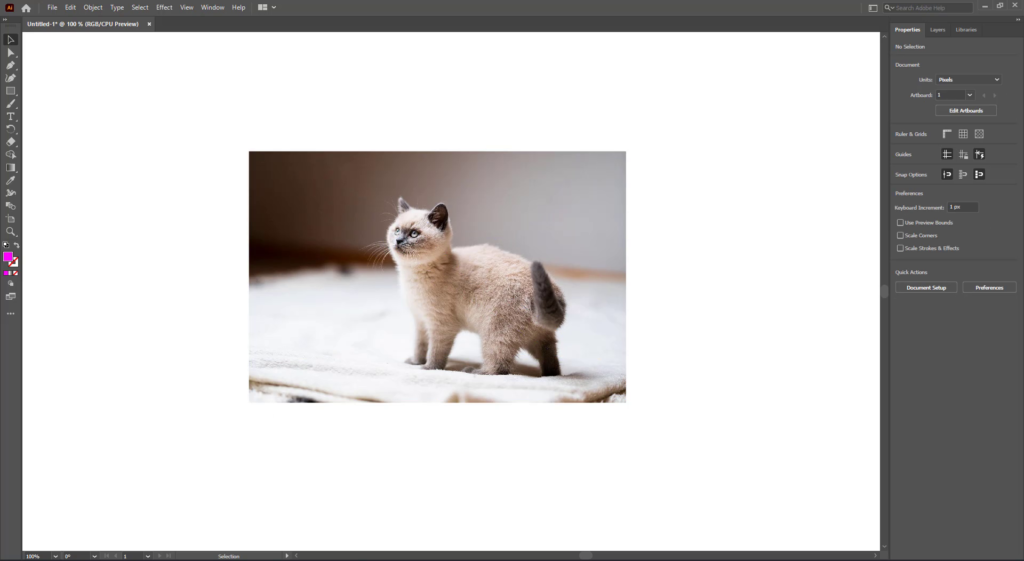
Click anywhere on the artboard and the image will be placed.
Step 2: Convert the image to grayscale
Before color overlay, you only need to convert the image to grayscale.
Select the image using the Selection Tool. You can grab the Selection Tool from the left toolbar or press V from the keyboard to activate Selection Tool.
Go to Edit > Edit Colors > Convert to Grayscale.
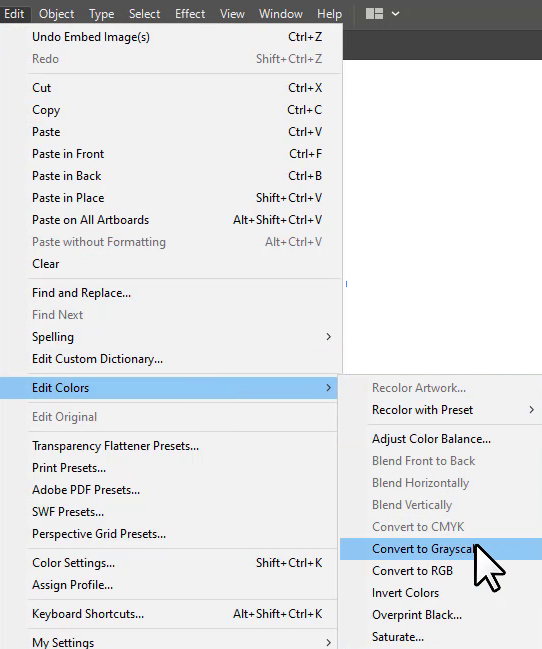
The image will be Grayscale.

Note: It is important to grayscale the image otherwise you will not get a good overlay result. So we recommend you grayscale the image that you are using.
Step 3: Create a rectangle on top of Image
As you have grayscaled the image, now it’s time to create a rectangle of the image size and right on top of the image.
Grab the Rectangle Tool from the left toolbar.

Draw a rectangle of the same size as the image.
Select the color of the rectangle, under Properties > Appearance > Fill. You can choose any color you want the image’s overlay.

Note: Make sure that the rectangle size is the same as the image. You can measure the size of the image and rectangle to make sure they are equal to each other.
Step 4: Set the blend mode to Overlay
Now, it’s time to change the blend mode of the rectangle to the overlay that we have created and placed on top of the image.
To open the Opacity and blending mode, open the Transparency panel.
Go to Window > Transparency.
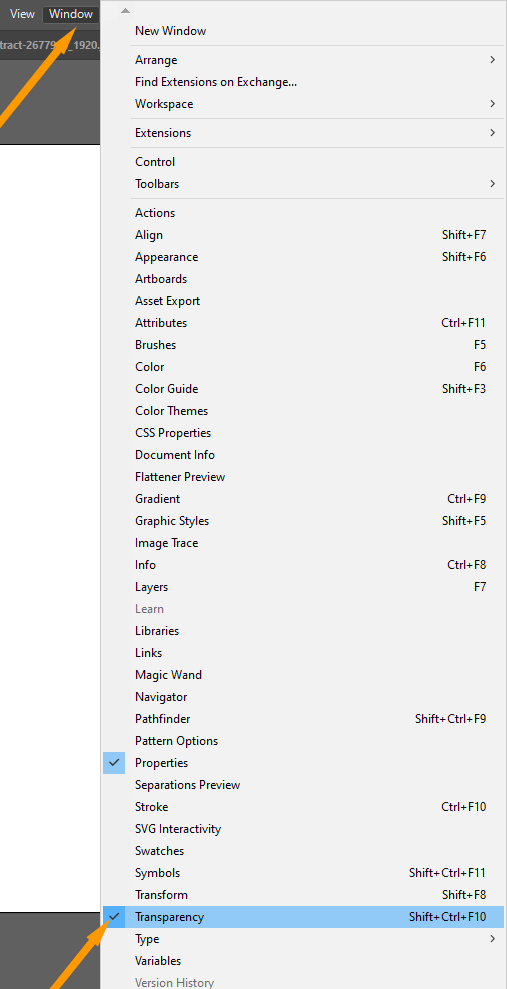
The Transparency panel will appear.

Select the Overlay blending mode.
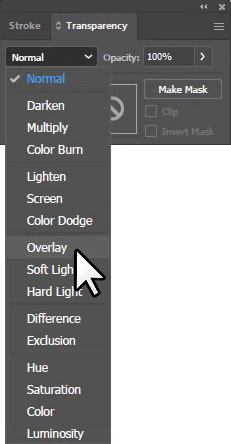
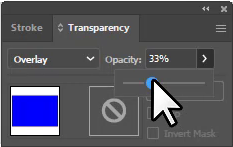
Change the Opacity depending on how much you want to make the transparent shape. We have selected 33% Opacity.
Here is the final look of the color Overlay for image in Adobe Illustrator.

To change the colors, you can select the top shape and then choose a new color it. The different overlay of the images are here.

You have learned to color overlay in Adobe Illustrator.
In this tutorial, you have learned how to color overlay in Adobe Illustrator. We have discussed the easiest way to color overlay for any image using the shape and then changing its blending mode to overlay and the color overlay is done.
Have More Questions?
If you have any questions related to color overlay in Adobe Illustrator then ask in the comment section below. We have also answered some most frequently asked questions below.
Illustrator Overlay Texture
To add the texture overlay to any image or object in Illustrator, select the image and go to Effect > Texture. Select any texture and click OK. The texture overlay is applied to the image.
Blend Mode Illustrator
You can find the Blend Mode in Illustrator in the Transparency panel. To use the Transparency panel, go to Window > Transparency. The Transparency panel will appear. Here you can find a list of different blend modes.
Where is Overlay in Illustrator
You can find the Overlay under the Transparency panel. You can find the transparency panel under the Window menu.
You can overlay any image or shape using this panel. Also, draw a shape on the top and give it a color of your choice and then add the overlay to the shape and reduce the opacity.
All Done! Enjoy.
Leave a Reply