
Mirror images are flip images. If you are trying to get a reflected image or a mirror image, then flip it. You may have noticed many times that the images have their own shadows. That’s the basic purpose of flipping any image. You may also want to see the flipped result to see the image from a different angle.
If you are new or you don’t have an idea about How to Flip an image, then this tutorial is for you. In this tutorial, we are going to give you a step-by-step guide to flipping an image in the Illustrator.
So Let’s start.
Table of Contents
2 Ways to Flip an Image in Illustrator (Easy & Quick)
In Adobe Illustrator, you can flip an image with 2 simple and quick methods. We will discuss both methods and then you can choose any method according to your choice.
Place Image on Artboard
Step 1: Go to File > Place.
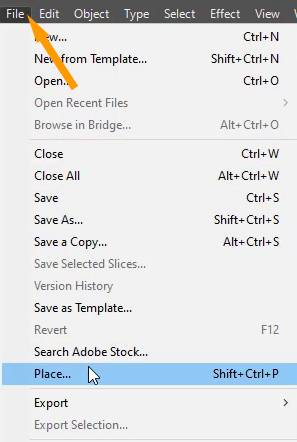
You can also press Shift+Ctrl+P from the keyboard to place an image in Illustrator.
Place panel will appear.
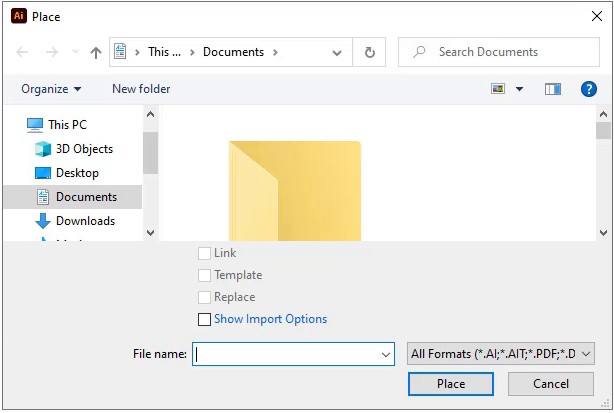
Step 3: Select the image from its location, uncheck Link(if selected) and click on Place.

The image will appear with the pointer.

Step 4: Left click once anywhere on the artboard and the image will appear.

The image that appeared on the artboard is bigger is overlapping on the artboard.
Note: Zoom out by pressing Ctrl- from the keyboard and then changing the size of the image.
Zoom in again by pressing Ctrl+ on the keyboard.

Step 5: To change the size of the image, bring the pointer to any corner of the image and it will be changed to resizing.

Step 6: Press & hold Shift+Alt from the keyboard, and then click on the corner of the image and start moving the pointer to the inner part of the image.
You will see that the image size is changing from all sides.

Step 7: Stop when you achieve the right size of the image. Here is the image after resizing it.

Move the image on to artboard by dragging it with the Selection Tool.


1st Method: Properties > Transform > Flip Horizontally
The easiest and quick way to flip an image is by using the Flip option available in the Properties panel.
Now we will flip the image that we have placed on the artboard.
Step 1: Grab the Selection Tool from the left toolbar.
You can also use the Selection Tool by pressing V from the keyboard.
How to Flip Horizontal in Illustrator
Step 2: Select the image that you want to flip.

Step 3: Go to Properties > Transform > Flip Horizontal.
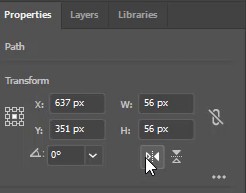
Note: If you don’t find the Transform panel in the Properties, then go to Window > Transform.

Press Shift+F8 from the keyboard and the Transform panel will appear in Illustrator.
Transform panel will appear.

Click on the three lines option in the top right corner.

Select Flip Horizontally.

As you click on Flip Horizontal, the image is flipped.

2nd Method: Reflect Tool
Any image can be flipped by using the Reflect Tool in Adobe Illustrator.
Step 1: Grab the Selection Tool from the left toolbar.

You can also press V from the keyboard to use the Selection Tool.
Step 2: Select the image using the Selection Tool.
Step 3: Right-click on the Rotate Tool.

From the list of tools, select Reflect Tool.

What is the shortcut for Reflect Tool in Illustrator
You can also press O from the keyboard and Reflect Tool will be selected.
Step 4: Double Click on the Reflect Tool.

Reflect panel will appear.
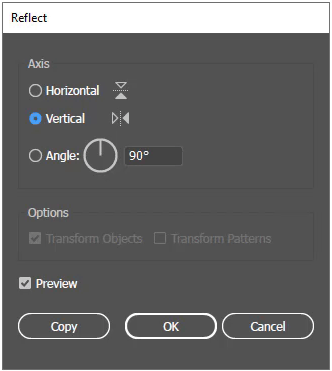
Step 5: In the Reflect panel, from the Axis section select Vertical, check Preview (to see changes), and Click OK.

Note: When you open Reflect panel, the Vertical option is already selected.
The image is flipped vertically.
You have learned to flip an image in Illustrator.
In this tutorial, you have learned to flip an image in Illustrator. You can flip any image using the above-given method. The easiest and quick way to flip an image in Illustrator is by using the Flip option available in Transform.
You can also watch a complete video tutorial to learn How to Flip an image in Illustrator that is given at the start.
Have More Questions?
If you have any questions related to flipping an image in Illustrator, you can ask in the comment section below.


Leave a Reply