
Unlocking the full potential of Adobe Illustrator requires a deep understanding of its powerful tools. Among these, the Selection Tool stands as a fundamental feature that every designer should master. In this article, we will delve into the intricacies of using the Selection Tool in Illustrator, providing you with valuable insights to enhance your graphic design workflow.
Table of Contents
Exploring the Selection Tool: An Overview
The Selection Tool, denoted by a solid arrowhead icon in the Illustrator toolbar, allows you to select, move, and manipulate various elements within your artwork. By familiarizing yourself with its versatile functionalities, you can save time and streamline your design process.

Selecting Objects with Precision
To select individual objects, simply click on them using the Selection Tool. However, when dealing with complex designs or overlapping elements, employing precise selection techniques becomes crucial.

Selecting Similar Objects
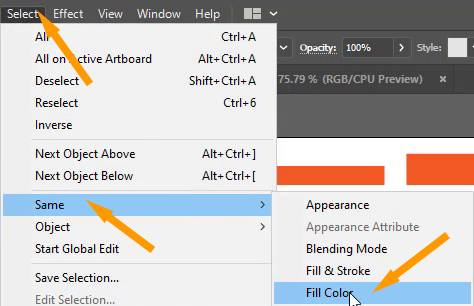
Illustrator enables you to select objects with similar characteristics effortlessly. To do this, select an object with the desired attributes, then navigate to the “Select” menu and choose “Same.” From there, you can select similar objects by fill color, stroke color, transparency, and more, empowering you to make swift changes across your artwork.
You can also learn: How to Select All Objects of the Same Color in Illustrator
Refining Selections for Advanced Editing
When it comes to intricate designs or precise edits, refining your selections becomes imperative. Illustrator offers various techniques to help you achieve meticulous selections:
Selecting Multiple Objects
To select multiple objects, hold down the Shift key while clicking on each object individually. Alternatively, you can drag a marquee around the desired objects to select them collectively. This technique proves useful when you need to perform group actions or apply consistent modifications to multiple elements simultaneously.

You can also learn: How to Select Multiple Objects in Illustrator
Adding to or Subtracting from Selections
Expanding your selection or excluding certain objects can be done easily within Illustrator. With the Selection Tool active, hold down the Shift key and click on additional objects to add them to the selection. Conversely, to remove specific objects from the selection, hold down the Alt key (Option key on Mac) and click on the objects you wish to exclude.
Transforming and Editing Selected Objects
Once you have made your selections, Illustrator equips you with powerful tools to transform and edit the chosen elements efficiently:
Moving and Repositioning
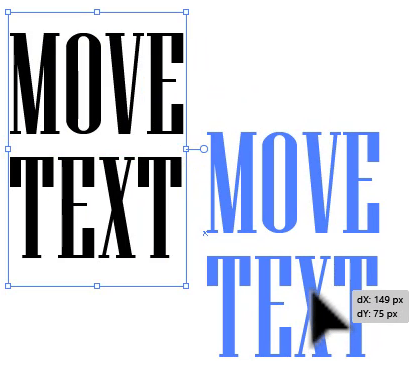
To move selected objects, simply click and drag them to the desired location. For more precise movements, you can use the arrow keys on your keyboard. Holding down the Shift key while dragging restricts movement to a straight horizontal or vertical direction, ensuring accuracy in your adjustments.
You can also learn: How to Move Text in Illustrator
Also learn: How to Move Artboards in Illustrator
Scaling and Rotating
Illustrator allows you to resize and rotate selected objects seamlessly. To scale an object, click on any of the corner handles while holding down the Shift key to maintain proportions. To rotate, click and drag the rotation handle located at the top of the selection, enabling you to achieve precise transformations effortlessly.
Scaling using the Scale Tool:

Rotate using the Rotate Tool:

You can also learn: How to Rotate Text in Illustrator
You can also learn: How to Use Rotate Tool in Illustrator
You can also learn: How to Resize Image in Illustrator
Utilizing Selection Tool Shortcuts for Increased Efficiency
In addition to the standard selection techniques, Illustrator offers a range of keyboard shortcuts that can significantly speed up your workflow. By incorporating these shortcuts into your design process, you can save time and navigate through your artwork more efficiently:
Selection Tool Shortcut (V)
To use the Selection Tool, simply press the V key on your keyboard. This shortcut allows you to switch between different tools seamlessly, enabling you to make swift selections without interrupting your creative flow.
Evolving Your Design Skills with the Selection Tool
As you become more proficient with the Selection Tool in Illustrator, you will unlock new possibilities for your design projects. Here are a few tips to continue improving your skills:
Experiment with Advanced Selection Techniques
Beyond the basic selection methods discussed earlier, explore advanced techniques such as using the Lasso Tool, the Pathfinder panel, or incorporating keyboard modifiers for precise selections. Continually experimenting with different selection approaches will expand your repertoire and empower you to tackle more complex design challenges.
You can also learn: Where is Pathfinder in Illustrator
Stay Updated with Illustrator Features
Adobe Illustrator frequently updates its features and tools to enhance user experience and functionality. Stay informed about new updates and explore tutorials and resources to discover additional tips and tricks for the Selection Tool and other tools within Illustrator.
Conclusion
Mastering the Selection Tool in Illustrator empowers designers to navigate through complex artwork with ease. By honing your selection techniques, you can efficiently manage objects, perform advanced edits, and unlock new levels of creativity. Embrace the power of the Selection Tool and elevate your graphic design capabilities in Adobe Illustrator.


Leave a Reply